How to create a standard RT-Thread project project? Detailed process analysis overview
1 Purpose and structure of this article
1.1 Purpose and background of this article
RT-Thread is completely open and open source, supports dozens of BSPs, supports multiple compilers, supports numerous basic components and a growing number of software packages. However, for engineering project development, only one or a limited number of MCUs need to be supported. Using a familiar IDE development environment, using limited peripherals and components, this document aims to guide users to build an RT-Thread engineering framework based on the project requirements based on the full-featured RT-Thread version.
1.2 The structure of this article
This article first introduces the necessary preparations, then how to use the Env tool provided by RT-Thread to configure the project, and finally how to add your own application code and manage your own modules.
2 preparations
Download the RT-Thread source code.
Prepare Env development environment
Install MDK software or IAR software.
3 Standard Project Management
3.1 Choose BSP
After the user obtains the RT-Thread source code, he can find the corresponding BSP according to his own development board model, and then he can run the default project provided by the BSP. Most BSPs support MDK, IAR development environment and GCC compiler, and have provided default MDK and IAR projects.
The subsequent chapters of this article will use the Punctual Atom STM32F4 Explorer development board to demonstrate related operations. The MCU model of this development board is STM32F407ZGT6, and the corresponding BSP used is stm32f4xx-HAL, which is in the BSP directory of the RT-Thread source code.
This BSP supports the development board with MCU model stm32f4xx. By default, the serial port 2 is used as the shell console output. The user can check the README.md file to view the serial port used by the development board. This article uses SEGGER JLINK to connect to JTAG debugging and USB SLAVE (USART1) for power supply.
3.2 Build the project framework
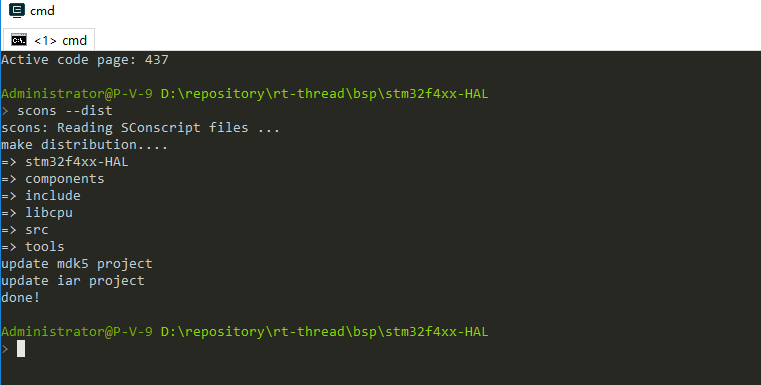
Open the Env tool and enter the stm32f4xx-HAL directory, and run the scons --dist command. Using this command will generate a directory named dist under the stm32f4xx-HAL BSP directory. This is the directory structure of the development project. The RT-Thread source code is located in the project folder and only contains the BSP of stm32f4xx-HAL. You can copy it to any directory Run down.
3.3 Modify the project template
For some basic configurations of the project, users need to make some project configurations according to their own needs, such as configuring the MCU model and setting debugging options. It is recommended that you modify the project template directly, so that the new project generated in the next stage will also include the modification of the template. The template project of MDK is template.uvprojx. The IAR template project is template.eww. Note that such modification of the IAR project template may cause the new project to be generated with the lower version of the IAR software unusable.
The figure below is an example of the chip model for modifying the MDK project template file.
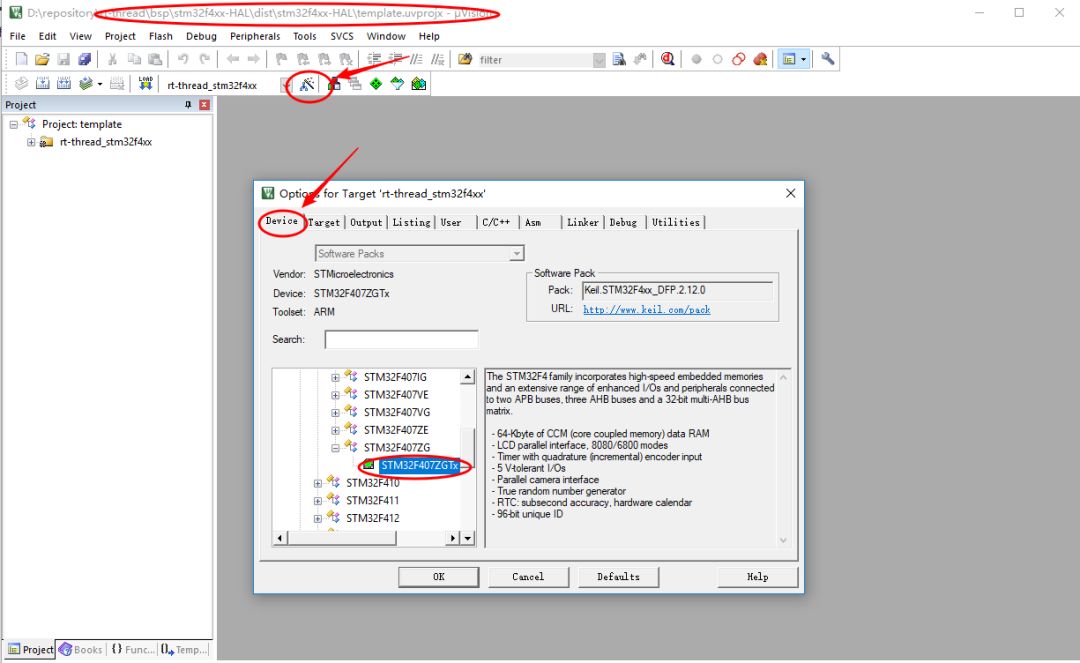
Then select the corresponding debugging option according to the debugging tool you use, and you can close the template project after the relevant configuration modification is completed.
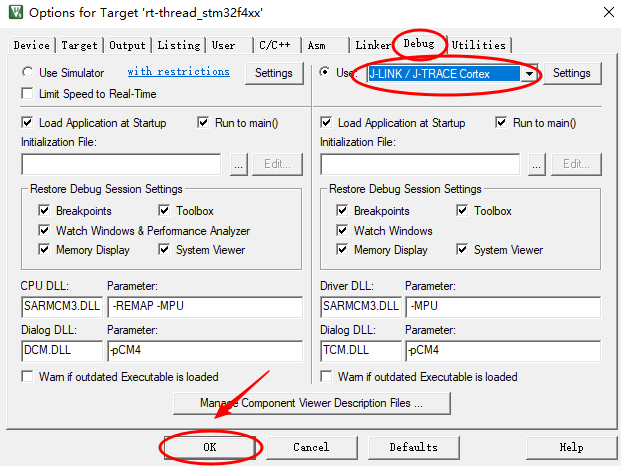
Note: It is recommended to modify the template file in other places where the project configuration needs to be modified, but it is not recommended to add it in the project template to add your own application code.
3.4 Configure and tailor RT-Thread
Each project under BSP has default configuration, such as the maximum thread priority supported by the system kernel, system clock frequency, device driver used, serial port used by the console, etc. The RT-Thread operating system is highly tailorable, and users can use the env tool to configure and tailor them according to their needs.
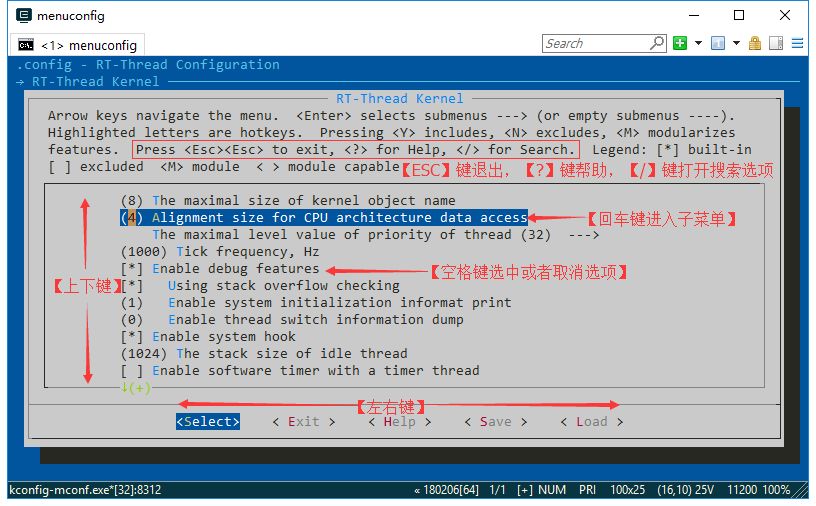
Double-click env.exe to open the configuration interface, and then use the cd d:epositoryt-thread\bsp\stm32f4xx-HAL command to enter the BSP project directory, followed by the user's own project directory. Then use the menuconfig command to open the configuration interface.
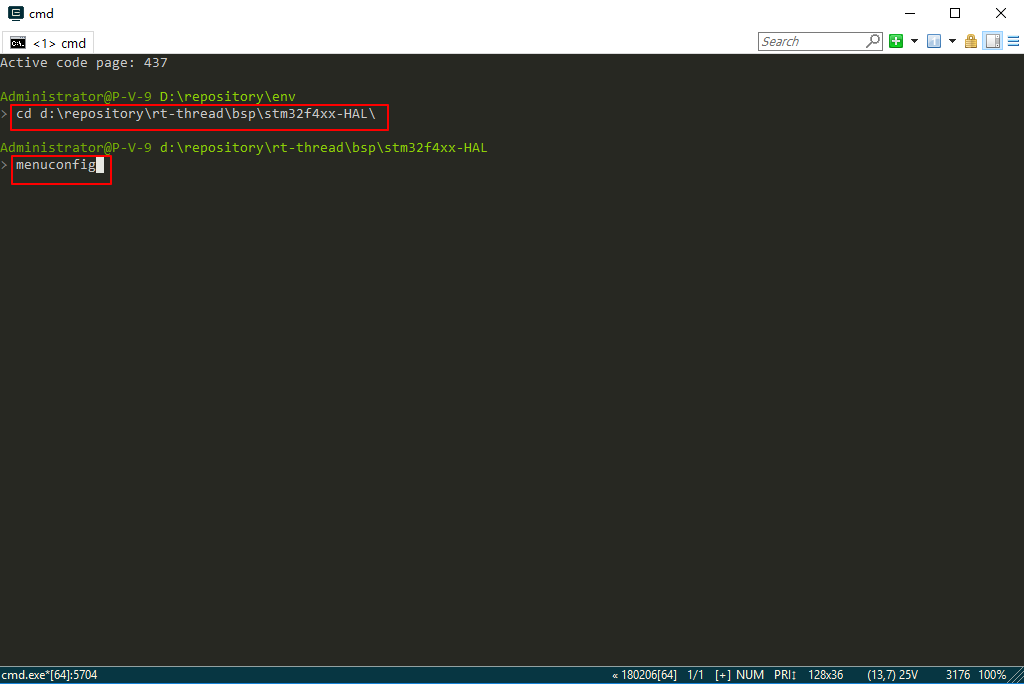
The commonly used shortcut keys of menuconfig are shown in the figure:
3.5 Enable online software package
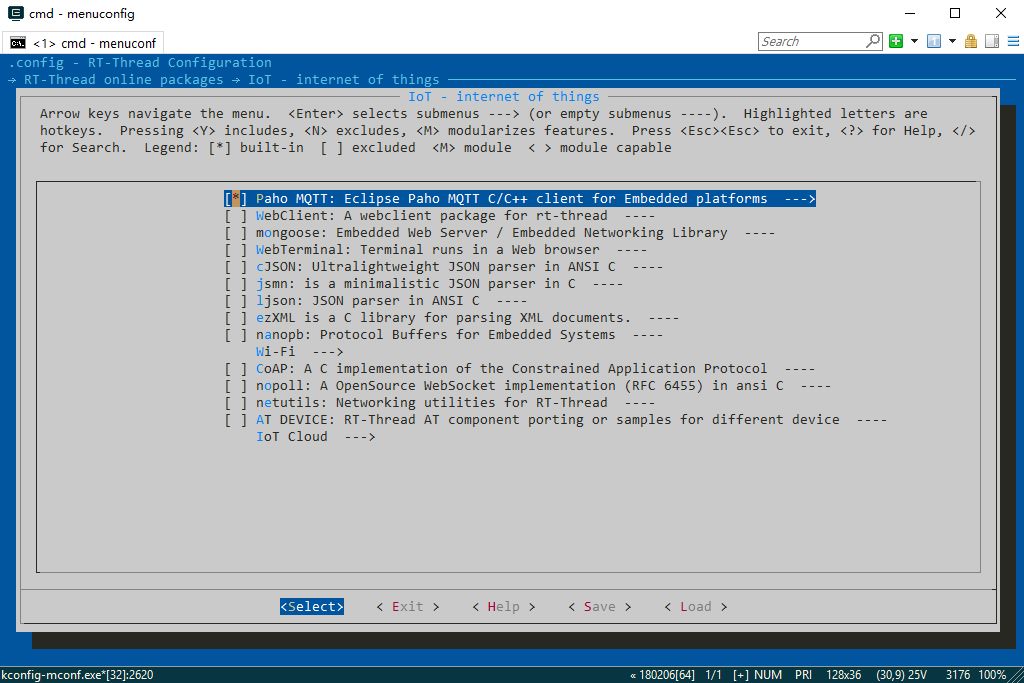
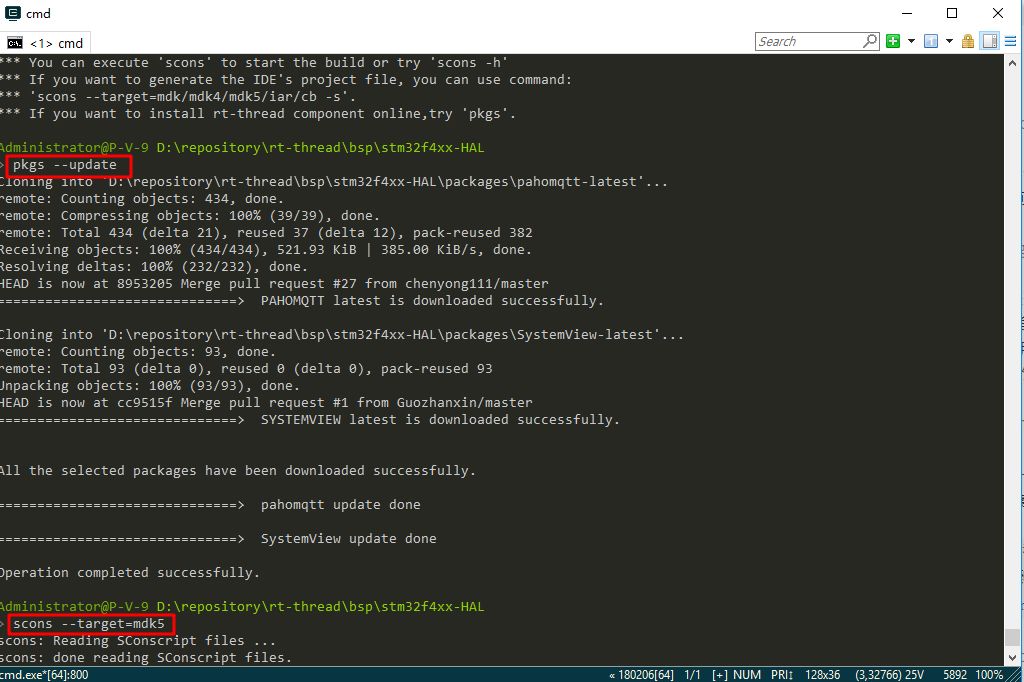
The following figure enables mqtt related software packages.
3.6 Generate Project
After configuring the project, use the scons --target=mdk5 command or the scons --target=iar command to generate the MDK or IAR project. If you directly modify the MDK project file project.uvprojx or the IAR project file project.ewww to add your own code, or modify some basic configuration of the project, the new project generated will overwrite the previous manual modification of the project file project.
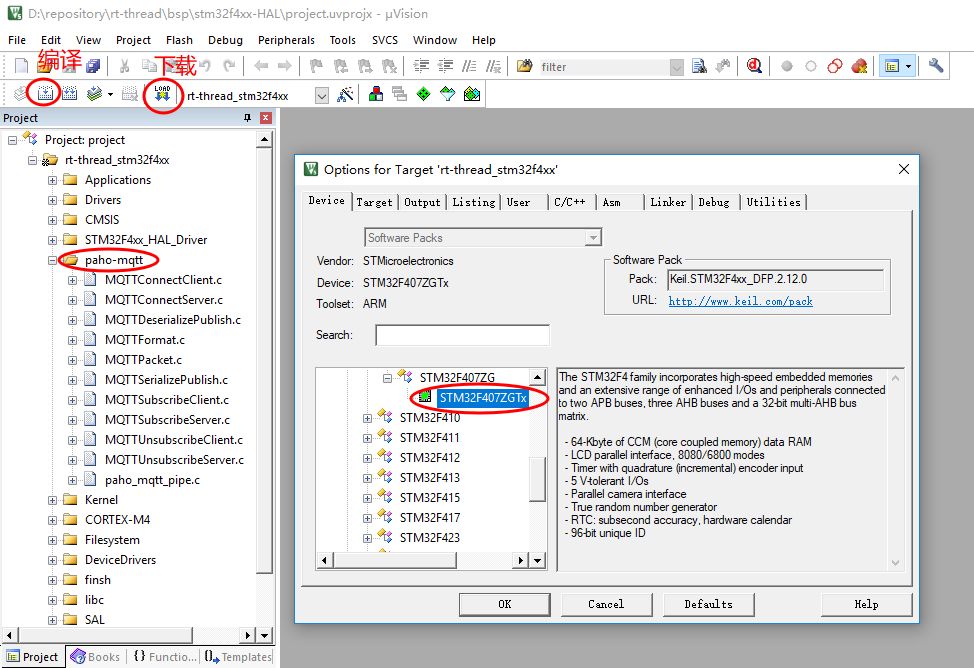
Open the newly generated MDK project project.uvprojx, you can see that the package source files related to the paho mqtt we selected have been added to the project.
3.7 Verification Project
Compile the project, generate the target code, and then download it to the development board to run. This article uses the terminal software PuTTY to receive the data sent by the engineering console corresponding to the serial port 2. Right-click the computer → Properties → Device Manager → Port (COM and LPT) to view the COM number corresponding to the serial port 2. This article is COM14. Open PuTTY and configure according to the following figure, the baud rate is generally set to 115200.
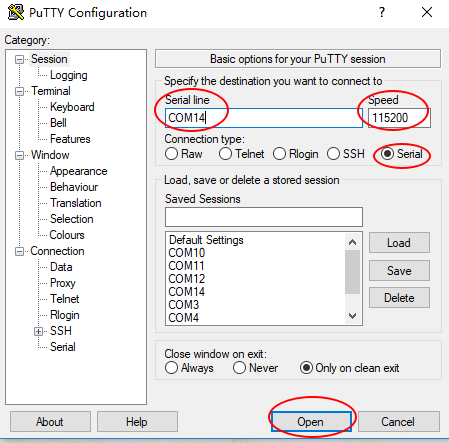
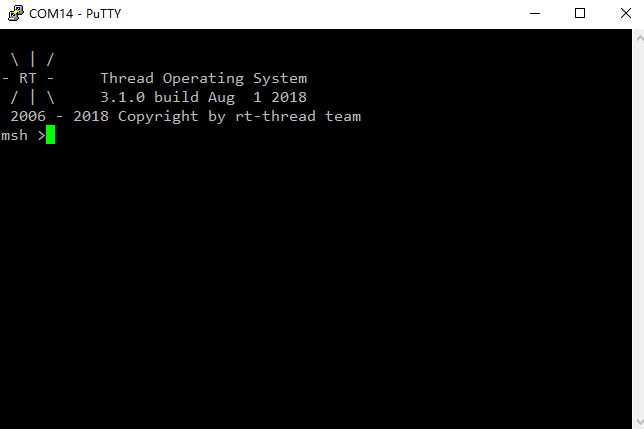
Click open to open it. After restarting the development board, you will see the RT-Thread startup logo information.
3.8 Add files to the project
The applications folder under the BSP is used to store the user's own application code, and currently there is only one main.c file. If the user does not have a lot of application codes, it is recommended that the relevant source files are placed under this folder. This article adds two simple files hello.c and hello.h under the applications folder.
/*file:hello.h*/
DB25 Female Connector, DB25 Male Connector,DB9 Male Connector,DB9 Female Connector,DB9 Right Angle Backshell,Molded D-Sub Cables
The On-site injection molding enables us to custom mold your D-Sub assemblies to your specs with logos. We are tooled for:
DB9 molded cables,,DB25 molded cables, DB50 molded cables, HD15 molded cables
DB Backshell or Boot-Kit Cables: The backshell cans and boot-kits are available for D-Sub DB15 cablesD-Sub DB37 cables.
Backshells are offered for: D-Sub high-density HD26, HD44, HD62, HD78
D-sub cable, DB cable, 9pin DB cable, molded DB connector, Data Cable
ETOP WIREHARNESS LIMITED , https://www.wireharnessetop.com