Read the installation process of eclipse 3.5
Eclipse Galileo has a brand new plugin installation dialog. In fact, the whole process was completely re-decomposed. This has become a convention in Eclipse: Eclipse 3.3 and 3.4 each have a completely different plugin installer.
Although the installation process for Eclipse 3.5 itself is relatively simple, there are still some issues you should be guiding. Below we will introduce some of the pitfalls you should avoid and the secrets to make this process smoother. These tips revolve around the installation dialog and can be found in the help for installing new software. (51CTO Editor's Note: For this Eclipse 3.5, there are many users who report that there are many problems with the installation and uninstallation of the plugin. I believe this article can solve some related problems.)
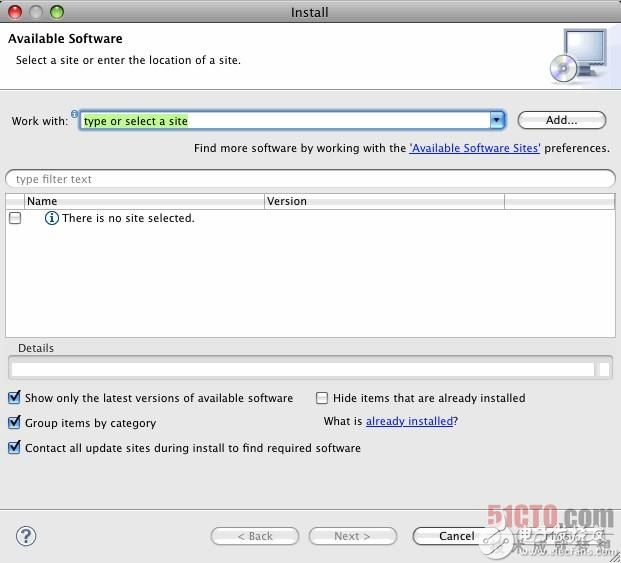
1. Do not select "Connect to all update sites" unless you need it.
In the installation dialog there is a small checkbox labeled "Connect to all update sites during the installation process to find the software you need." On the surface, this seems like a good idea: if you install A plugin, but your platform doesn't have all the necessary plugins, it's easy to find them and install them automatically.

In fact, this will have some negative effects that we don't expect: First, because Eclipse may link to more update sites than you might expect, this process may be slower. Other sites may not be as fast (especially if you are not in North America). However, this is not a bad part. In the process, Eclipse may find other plugins that are completely unrelated.
Obviously, this process needs to be improved. My suggestion is: leave this checkbox unchecked. If some related attachments are not installed, the installation process will inform you at the next step that you will not be able to proceed without it. In this case, open it, and...
2. Carefully review what you want to install
When you select the plugin to install and click Next, Eclipse performs several checks. The next dialog is very important. Don't just click on the next step to have it automatically remove it. Read this information and make sure you understand the plugins you have installed.
In some cases, some plugins that are not related to the plugin you are installing may be added during the installation process. You may choose to remove these (these plugins may not be used every time).
3. Be wary of “grouping by categoryâ€
The next checkbox processing is "Group by Category". This seemingly harmless button far exceeds your imagination. It is true that it will aggregate the items you see by category, which are what you want. However, if the entry on the site is not categorized, they will not appear, so you will not be able to install it.

The new site is considered to be classified (assuming it is a keyword here). Old sites may not be classified. This makes new users very confused, so be careful. This is also an important consideration for those who build update sites: be sure to categorize your plugins even if you only have one plugin .
4. Run many processes in the background

The update site is joined by the background. You can see the progress in the lower right corner of the screen. Fortunately, in Eclipse 3.5 you can cancel this process (used in Ganymede). After you close the installation dialog, the background process may still be running even if you don't have anything installed at all.
5. Install the EPP package
This secret should appear in a completely different article because it is very important, but many people are not familiar with it. EPP stands for Eclipse Packaging Project. This project is responsible for creating the Eclipse download package.
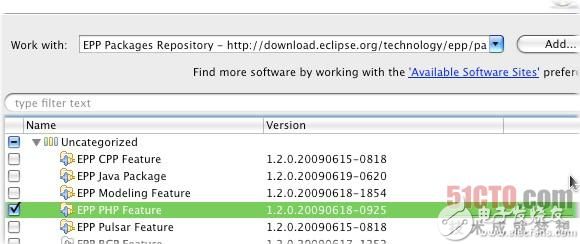
When you first download Eclipse, you need to choose the package: "Eclipse IDE for Java Developers", "Eclipse IDE for PHP Developers", etc. These packages are part of the EPP.
What if you want to target both the Java and PHP developers' Eclipse IDE? very simple. Please download a package first and add another package from the update site. You can download the Java package first, and once it starts running, follow these steps:
1) Go to Help → Install New Software.
2) From the drop-down site, select the site named "EPP Package Library"
3) Select "EPP PHP Feature" and follow the remaining installation wizard to install.
This is a very simple way to install the entire package into your IDE. Similarly, you can install 64-bit Mac OS X packages in this way, although this method is not feasible on the main download page.
6. Drag and drop archive
If you have an archive with an updated site, you can simply discard it and add it to your favorites in the installation dialog. This works on Windows and not on Mac OS X.
7. Keep all sites

Keep in mind that Eclipse will not "forget" to update the site unless you specifically request it. For example, if you enter a wrong URL or a temporary archive, it will always exist. If you want to delete it, you must go to the "Available Software Sites" preferences and explicitly delete them. You can access this page by clicking on the link "Available Sites" from the installation dialog.
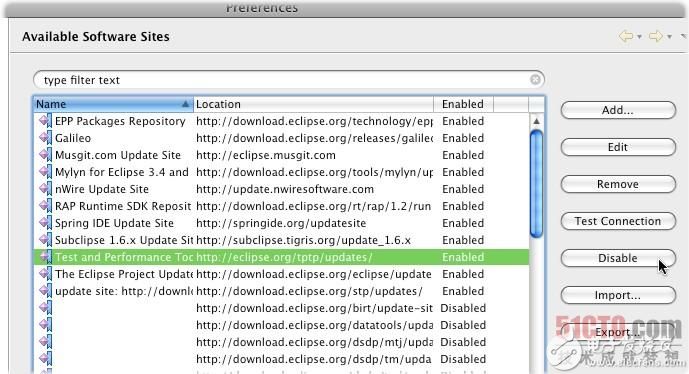
The Preferences page will display the enabled and disabled sites. You can disable it on a site without having to delete it. When looking for updates or missing plugins, sites that are disabled when searching will be skipped. However, you can still find them by entering a part of their name in the address bar of the installation dialog. There is no need to enable the site from the beginning: once you find the site and select it, it will be automatically enabled.
8. Restart after installing the plugin
Eclipse is based on a powerful architecture called OSGi (51CTO Editor's Recommendation: Explore Java Enterprise Open Source Framework OSGi), which reinstalls attachments and plugins. However, in my experience, it may not work. Therefore, although it is possible to continue without restarting it, it should be restarted.
9. Uninstall
Uninstall the plugin from the Eclipse → Installation Details → Install Software. Just select a feature and click Uninstall. You only need to click "What is installed?", you can enter the same dialog from the installation dialog.

Please note that when uninstalling the plugin, Eclipse can still link to the update site and install the update. This failure is expected to be fixed in a future release. To avoid this, you can disable the update site on the Preferences page of the Available Software Sites.
10. There are other accessories
The large and complex plug-in installation process creates a need, and it is clear that this need can be filled by third-party tools. Personally, I use Pulse, it's free, but there are other good and free accessories.
These more streamlined tools will replace the standard plugin installer. They often provide directory plugins, and you can select plugins and install them faster with a simple drag and drop operation. This ended the notorious "plug-in hunt".
In particular, Pulse, you can also build and maintain your own configuration, with one click, you can install and reinstall. You can also share it with your team. I recommend that both new and old users consider using these accessories.
Switch & Socket,Sockets And Switches,Brass Plug Sockets,Light Switches And Sockets
WENZHOU TENGCAI ELECTRIC CO.,LTD , https://www.tengcaielectric.com